This bread is extremely easy and good. And I can’t take
credit for it. The only work I am doing
here is the research of making sure that anybody can do it. And, as the saying goes, if I can do it, so
can you. The bonus you get with my blog is stories.
The Els family knows their bread. Great Grandpa Els, father of four sons, all who went into the business, owned Els Bakery in Dallas. He started out and failed at chicken ranching. Nobody knows how or why he went into baking. No one ever saw him bake bread or so much as lift a cup of flour. With six kids he was more into management. And he was a strict manager. Family lore tells of the time he fired a gun at Uncle Willie. But that's another story for another day.
As you might imagine, as the Els sons grew up they moved to other towns. Uncle Buddy moved to a bakery in Louisiana did very well for himself. Willie went to Ft Worth, Buster to Tulsa. Only Beaven's father, Baby to the family since he was the youngest stayed in Dallas and managed the original Els Bakery. I grew up seeing it on the shelves of the grocery. They were the only ones who baked the specialty breads: Salt-free, Salt-rising, Sour Dough, French Bread, Parker House Rolls and Rye.
But the Elses know our bread. When visiting Uncle Buster we would start the meal with him picking up the loaf of bread and taking a slice of bread and tearing it to check for it's texture. It reminded me so much of the way the pastor tears the bread at communion that it made the gesture almost sacred. And to Buster the move was almost that special. He was checking himself to see if the day's bread was up to his standards. Were there too many holes or irregularities? He knew his recipes and his dough. He wanted to know his finished product.
I could go on when you came here for a recipe. Let me get back to the story.
....................
Emily brought the idea home from her book club. Except that she is honest enough to call it a
wine and cake club. Only at the end did
they come up with a book title that they said, “Oh, yeah, we should read a
book.” So they came up with a book to read so they could meet again a month
later for more wine and cake. These same
friends got together for dinner and one served this bread and she brought home
the recipe. She may not be coming home
with a lot of intellectual ideas but a lot of great calories well worth
achieving.
And I have to admit that this recipe in various forms is
available everywhere in cyberspace. I
found over five on YouTube and that’s just the Dutch over version. You can branch off into a variety of shapes
and flavors, including Foccacia, which is definitely next on my list. I'll put the link to the YouTube I watched at the end of this post. Yes, it's cheating. I prefer to call it extensive research.
Meanwhile, let’s get started.
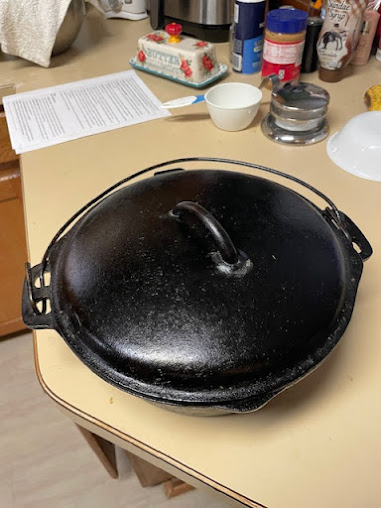
To start with you really do need a Dutch Oven. I think the heat retention of the cast iron
is key to making the crust work. Because if they say it once, they will say it 5,000 times this bread is crunchy on the outside and soft on the inside. Don't despair if you have one of those fancy enameled ones you bought for an arm and a leg-- inside that sucker it's cast iron. They just enameled outside to make it look pretty. You can use your expensive Dutch oven.
It just
so happens that when Em showed up with this recipe my Dutch oven was sitting in
the kitchen cabinet waiting for the next campfire.
Now, you will need the right ingredients. The recipes and even the YouTubes will tell
you that you can use All-Purpose flour but I’ve gotten serious enough about
cooking by now (I make my own pasta noodles) that I keep bread flour in the
cabinet. Walmart sells it so it’s not
that hard to get. Walmart even delivers
now so life doesn’t have to be that hard.
I also got some of that Instant Yeast in the jar. That way I can cheat and add a little more
yeast if I want and not be restricted to what they put in the little
envelope. I am also the kind of cook who
regularly uses a tablespoon when the recipe calls for a teaspoon of vanilla. So, yeah, sometimes more is better.
Now, armed with the accoutrements, we can make this
incredibly easy and sparse recipe—with ONLY FOUR INGREDIENTS: Flour, yeast, salt and water. Could it be any easier? AND there is NO
KNEADING.
Assemble ingredients:
1 cup water
1 teaspoon yeast
2 1/2 cups bread flour
1 teaspoon salt
The main thing that makes this bread work is that you will
pre-heat the cast iron Dutch oven.
** Step one: Mix it
Pour the water into a big bowl
Add the yeast and salt.
Add the flour gradually making sure it’s all incorporated
Cover the bowl and let sit for about three hours. Yes, three hours. Forget about it. Go to the
movies
**Step two: Pre-heat the oven to 450 degrees
with the dutch oven and its lid inside for 30 minutes. Don’t skip this step. Include the lid. You are going to have an oven inside an oven.
**Step three: Work the Dough - wet your fingers and gather the dough at the
sides. Gently pull the dough up at the
sides, lift it up and fold it over to the center turning the dough a quarter
turn. Repeat this until you have lifted all
the dough up and over. This is a gentle
form of kneading. Wetting your fingers
keeps the dough from sticking to your hands.
Lift the dough out of the bowl and onto a sheet of parchment paper. With a bit of flour on it. Transfer the dough onto the parchment
paper. Gently work the dough into a ball. Pinch the sides and gather them onto the
bottom of the ball, stretching the pinched parts onto the bottom of the ball so
that the top of the ball is smooth. Sprinkle
the top of the ball with a little flour and smooth it with your fingers. Cover this with a bowl turned upside down
over the dough.

Step four** Bake It - after the over has pre-heated
for 30 minutes pick up the parchment paper by the edges and transfer the dough
into the Dutch oven and put it into the over.
With a sharp razor, cut an X into the top of the bread. Place in over and bake for 20 minutes covered.
After 20 minutes take the lid off the Dutch over and bake another 10 minutes
uncovered. Check for desired color. You should be able to pick the bread up by
the parchment paper and take it out of the Dutch oven. Remove the paper and place it on a cooling
rack.
One last tip: Use a serrated knife to cut this bread. And for goodness' sake don't press down when you are holding the bread. Let the knife do the work. Just hold the bread in place and let the serration of the knife grad hold of the bread once you get a start the knife will do its work. At our house we've ended up cutting the loaf in half and cutting across the half to make smaller pieces. It's just easier to manage.
Now, as promised is the YouTube video of how to do this:
https://img1.blogblog.com/img/video_object.png
https://youtu.be/zIYZhTjcKmE?si=icEtU9OyeS_N487_
If the video doesn't work just look up Food Language on YouTube and look for the new perfect 4-ingredient bread. It should be one of the first videos that pop up. It's very popular. I'm not the only genius in America.


