How to Use this Blog

This blog is designed to be used like a cookbook. I've put tags on each recipe so you can go to the section on that topic just by clicking on the word in the cloud or the list. Some recipes are under more than one category to help you find what you're looking for.
Showing posts with label Thanksgiving. Show all posts

Thursday, March 20, 2025

Bread


This bread is extremely easy and good. And I can’t take credit for it.  The only work I am doing here is the research of making sure that anybody can do it.  And, as the saying goes, if I can do it, so can you. The bonus you get with my blog is stories.

The Els family knows their bread.  Great Grandpa Els, father of four sons, all who went into the business, owned Els Bakery in Dallas.  He started out and failed at chicken ranching.  Nobody knows how or why he went into baking.  No one ever saw him bake bread or so much as lift a cup of flour.  With six kids he was more into management.  And he was a strict manager.  Family lore tells of the time he fired a gun at Uncle Willie.  But that's another story for another day. 

As you might imagine, as the Els sons grew up they moved to other towns.  Uncle Buddy moved to a bakery in Louisiana did very well for himself.  Willie went to Ft Worth, Buster to Tulsa.  Only Beaven's father, Baby to the family since he was the youngest stayed in Dallas and managed the original Els Bakery.  I grew up seeing it on the shelves of the grocery.  They were the only ones who baked the specialty breads:  Salt-free, Salt-rising, Sour Dough, French Bread, Parker House Rolls and Rye.  

But the Elses know our bread.  When visiting Uncle Buster we would start the meal with him picking up the loaf of bread and taking a slice of bread and tearing it to check for it's texture.  It reminded me so much of the way the pastor tears the bread at communion that it made the gesture almost sacred.  And to Buster the move was almost that special.  He was checking himself to see if the day's bread was up to his standards.  Were there too many holes or irregularities?  He knew his recipes and his dough.  He wanted to know his finished product.

I could go on when you came here for a recipe.  Let me get back to the story.

....................

Emily brought the idea home from her book club.  Except that she is honest enough to call it a wine and cake club.  Only at the end did they come up with a book title that they said, “Oh, yeah, we should read a book.” So they came up with a book to read so they could meet again a month later for more wine and cake.  These same friends got together for dinner and one served this bread and she brought home the recipe.  She may not be coming home with a lot of intellectual ideas but a lot of great calories well worth achieving.

And I have to admit that this recipe in various forms is available everywhere in cyberspace.  I found over five on YouTube and that’s just the Dutch over version.  You can branch off into a variety of shapes and flavors, including Foccacia, which is definitely next on my list. I'll put the link to the YouTube I watched at the end of this post.  Yes, it's cheating.  I prefer to call it extensive research.

Meanwhile, let’s get started.

To start with you really do need a Dutch Oven.  I think the heat retention of the cast iron is key to making the crust work.  Because if they say it once, they will say it 5,000 times this bread is crunchy on the outside and soft on the inside. Don't despair if you have one of those fancy enameled ones you bought for an arm and a leg-- inside that sucker it's cast iron. They just enameled outside to make it look pretty.  You can use your expensive Dutch oven.  

It just so happens that when Em showed up with this recipe my Dutch oven was sitting in the kitchen cabinet waiting for the next campfire.
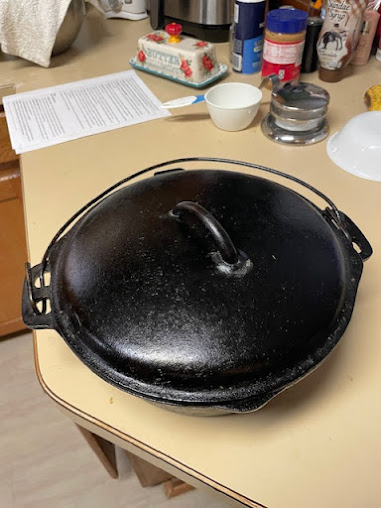


Now, you will need the right ingredients.  The recipes and even the YouTubes will tell you that you can use All-Purpose flour but I’ve gotten serious enough about cooking by now (I make my own pasta noodles) that I keep bread flour in the cabinet.  Walmart sells it so it’s not that hard to get.  Walmart even delivers now so life doesn’t have to be that hard.

I also got some of that Instant Yeast in the jar.  That way I can cheat and add a little more yeast if I want and not be restricted to what they put in the little envelope.  I am also the kind of cook who regularly uses a tablespoon when the recipe calls for a teaspoon of vanilla. So, yeah, sometimes more is better.

Now, armed with the accoutrements, we can make this incredibly easy and sparse recipe—with ONLY FOUR INGREDIENTS:  Flour, yeast, salt and water.  Could it be any easier? AND there is NO KNEADING.

Assemble ingredients:

1 cup water

1 teaspoon yeast

2 1/2 cups bread flour

1 teaspoon salt

The main thing that makes this bread work is that you will pre-heat the cast iron Dutch oven.


**  Step one:  Mix it

Pour the water into a big bowl

Add the yeast and salt.  Add the flour gradually making sure it’s all incorporated

Cover the bowl and let sit for about three hours.  Yes, three hours. Forget about it. Go to the movies

**Step two: Pre-heat the oven to 450 degrees with the dutch oven and its lid inside for 30 minutes.  Don’t skip this step. Include the lid.  You are going to have an oven inside an oven.

**Step three: Work the Dough -  wet your fingers and gather the dough at the sides.  Gently pull the dough up at the sides, lift it up and fold it over to the center turning the dough a quarter turn.  Repeat this until you have lifted all the dough up and over.  This is a gentle form of kneading.  Wetting your fingers keeps the dough from sticking to your hands.  Lift the dough out of the bowl and onto a sheet of parchment paper.  With a bit of flour on it.  Transfer the dough onto the parchment paper.  Gently work the dough into a ball.  Pinch the sides and gather them onto the bottom of the ball, stretching the pinched parts onto the bottom of the ball so that the top of the ball is smooth.  Sprinkle the top of the ball with a little flour and smooth it with your fingers.  Cover this with a bowl turned upside down over the dough.


Step four** Bake It - after the over has pre-heated for 30 minutes pick up the parchment paper by the edges and transfer the dough into the Dutch oven and put it into the over.  With a sharp razor, cut an X into the top of the bread.  Place in over and bake for 20 minutes covered. After 20 minutes take the lid off the Dutch over and bake another 10 minutes uncovered.  Check for desired color.  You should be able to pick the bread up by the parchment paper and take it out of the Dutch oven.  Remove the paper and place it on a cooling rack.


One last tip:  Use a serrated knife to cut this bread.  And for goodness' sake don't press down when you are holding the bread.  Let the knife do the work.  Just hold the bread in place and let the serration of the knife grad hold of the bread once you get a start the knife will do its work.  At our house we've ended up cutting the loaf in half and cutting across the half to make smaller pieces.  It's just easier to manage.  

Now, as promised is the YouTube video of how to do this: 

https://img1.blogblog.com/img/video_object.png


https://youtu.be/zIYZhTjcKmE?si=icEtU9OyeS_N487_

 If the video doesn't work just look up Food Language on YouTube and look for the new perfect 4-ingredient bread.  It should be one of the first videos that pop up.  It's very popular. I'm not the only genius in America.  


Tuesday, April 25, 2023

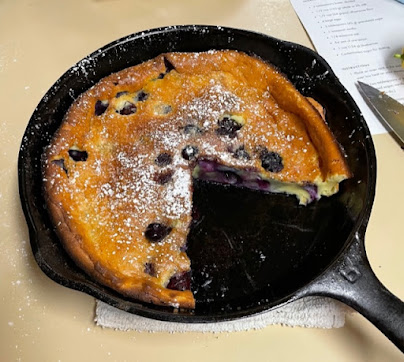
Blueberry Dutch Baby


Most of these ingredients I keep on hand except for the blueberries and lemon zest.  The blueberries are usually sold in a quantity that ends up being two cups so I need to buy two lemons.

INGREDIENTS

  • 4 tablespoons butter, divided
  • 1/2 cup  whole or 2% milk
  • 1/2 cup  all-purpose flour
  • 4 large eggs
  • 3 tablespoons sugar
  • 1 teaspoon vanilla
  • 1/4 teaspoon salt
  • the zest of one lemon
+++
  • 1 cup blueberries
  • Confectioners sugar for dusting
Maple Syrup


INSTRUCTIONS

  1. Place an oven rack in the middle position and preheat the oven to 450°F. Place a 9- or 10-inch cast iron skillet over low heat on your stovetop. Keep it over low heat while you prepare the batter. 
  2. Melt two tablespoons of the butter in the cast iron skillet, then transfer to a blender. Add the milk, flour, eggs, granulated sugar, vanilla, salt, and lemon zest, and blend until smooth. (Do not skip this step — the batter will be lumpy if you do.)
  3. Place the remaining 2 tablespoons of butter into the cast iron skillet. Turn the heat up to medium-high. Let the butter melt, add the blueberries, and give the skillet a shake. Immediately pour the batter over the blueberries and transfer the skillet to the oven. Bake until the pancake is puffed and golden, about 15 minutes.
  4. You might be tempted to open the oven to check on things-especially if your oven glass door is dirty like mine and you can't see.  Resist this temptation and trust your oven temperature.  It will be ready in 15 minutes; no sooner and no later.  If you open the door you run the risk that it will fall and maybe you have invited guests that you want to see the dramatic tall dish that will then fall right before them and not in the depths of your oven.  
  5. Remove pan from the oven, and dust with confectioners sugar, if you wish. Cut and serve immediately with maple syrup. Yes, it will fall.  You have not failed.  And if you can't serve it immediately, that's OK, too.  Hot blueberries can be overwhelming. But nobody is going to want to wait.  This is tasty. 

Friday, November 16, 2018

Thanksgiving 2018

It’s time.  For the next month or so you will be cooking your fool head off.  You will cook things you only cook on holidays and eat more than you eat any other time of the year.  

This is your magic weekend.  The calm before the storm, so to speak.  It would be a good time to clean out the fridge.  You could make a game out of it.  Wager someone how old the oldest expiration date will be.  You should also check your spices.  

You will need to buy new sage and/or poultry seasoning.  Definitely get a new box of baking powder. And yeast. These things all have expiration dates and if you only bake at the holidays your current supply is out of date.  Do this now before the store runs out of sage. I have seen it happen. There is nothing more pathetic than trying to find sage at the Seven Eleven the night before Thanksgiving. (clue: They don’t sell sage there. However, they probably DO sell beer and you’re gonna need a lot of it if you try to put dressing without sage on your table.)

I have noticed that cake mixes don’t yield as much cake as a few years ago.  I don’t know when they slipped in this change but I noticed a year ago that a two-layer cake isn’t as tall as it used to be. You could mix up two boxes and bake three layers.  You’ll get a slightly bigger cake than usual but it’s all a matter of whether you want to look limp and feeble or hale and hearty for the holidays.

The alternative is to make it from scratch.  I may try this but it has emerged that our family is a PIE family, not a cake family.  So, I may not even fool with it.

I have most of the classic recipes here on the blog index.  Look for  the "Thanksgiving" label.  When you click on it you will get everything in that category--- from How to Cook a Turkey to a new cranberry relish recipe I love.  It's not in any kind of order so Quiche shows up before Turkey--keep scrolling. Cooking a turkey is one of the oldest recipes so it shows up at the very end.  I put some breakfast choices for those of you who have overnight guests. I’m not sure if I put a sweet potato pie recipe here.  I got into BIG trouble one year trying to foist off Sweet Potato pie as a Pumpkin pie.  I think I permanently lost Elizabeth’s trust over that one. LET ME JUST SAY……..I Don’t think you can tell the difference and you’re not inviting Elizabeth over for dinner, anyway.

Remember my favorite tip:  In cold weather you can use your outside BBQ grill as a second refrigerator.  Just as long as it has a heavy cover, that is--to keep the raccoons out. And watch for the afternoon temperature…it might get warmer than your ice box.

You can tell I’m old because I just used the word “ice box.”

 Have a GREAT Thanksgiving/Hanukah/Christmas!

PS--Hey!  You still have to click on the "Thanksgiving" part down there on the bottom left.  It's the little orange highlighted word.  Otherwise, you are stuck with "Summer Slaw".  This is not automatic.


Saturday, November 26, 2016

Quiche

It helps to make it in a really cute pie plate.  I had run out of pie pans by this time.


Quiche is the perfect holiday breakfast and lunch food.  To start with, it works for either meal.  And you can make it ahead.  Then it can sit there in your fridge for days and days patiently waiting for its turn to shine.  You can ignore it until you need something classy and substantial, something healthy and light.  It's protein without being heavy. And you can dish it out one serving at a time if you want; in fact, it's almost better that way--especially if you do it MY way.

.....................

To make your Quiche better than anyone else's, start with a puff pastry dough.  Get it from the freezer case at the store and thaw at home.

Ingredients:

  • package of puff pastry (they come with two crusts, use only one of them, and put the other one back in the freezer)
  • 2 TBSP finely chopped onions
  • 8 slices bacon
  • 4 large eggs
  • 1 1/2 cups whole milk or half & half (You could also use whipping cream but it's almost too rich this way)
  • pinch of nutmeg
  • pinch of cayenne pepper
  • 1 1/2 cup grated swiss cheese
You can also add other veggies to it like broccoli or halved grape tomatoes (on top, not inside).  I once added some left-over pico de gallo and it was fantastic. Quiche is very welcoming

  1. Preheat over to 375 degrees
  2. You might have to roll the puff pastry out a bit to get it big enough to make crust big enough for the pie pan.  Once you have it, lay it loosely over the pan.  Don't mash it together like other pie crusts.
  3. Mix the milk and egg well with the spices
  4. Cut the bacon into small pieces and fry until crisp.  Add the onion and fry that until soft.  Take off heat, drain and cool.
  5. Mix the cheese, bacon and onion together and fill the pastry.  Pour in the egg mixture carefully.
  6. Bake at 375  40 minutes
  7.  It's done when a knife inserted comes out clean
When you are ready to serve the quiche you can serve it hot out of the oven.

Or you can cut one slice and re-heat it on a pre-heated pizza stone in a 350 oven.  (This is best achieved by letting the stone heat at 400 degrees for a long time then reducing the oven just before you put the quiche on the stone).  This will have the effect of crisping the bottom crust while heating and softening the filling.  It's actually better this way.

Saturday, February 13, 2016

Stabilized Whipped Cream

Sorry about the drab technical term.  There's no better way to describe it.  This is a recipe for taking whipping cream and give it a little UMPH! to help it last through a long weekend or a hot summer picnic or survive under the weight of a layered triffle.  Basically, it's just regular whipped cream fortified with a little gelatin.  This recipe makes it really stout.  It's the baker's equivalent of three cans of hairspray on your hairdo. It's your secret battle plan.

You can find unflavored gelatin either with the Jello or sometimes with the baking stuff like yeast.


Ingredients:
1/4 cup cold water
1 teaspoon unflavored gelatin
1 cup heavy whipping cream
1 Tablespoon sugar
1/2 teaspoon vanilla extract

Directions:

1.  Chill the mixing bowl and beaters for at least 15 minutes before using.
2. Place water in small microwave-safe bowl and sprinkle the gelatin over the water.  Let the gelatin soften for 5 minutes
3.  Dissolve the gelatin by microwaving for a minute at very low power 30% power.  You may need to hit it again.  The trick is to get the gelatin dissolved but not hot.  Let it stand until it's room temperature but still liquid.
4.  Put the whipping cream, sugar and vanilla in the cold bowl and start mixing it until the cream starts to set up and shows marks.
5. Add the gelatin slowly, beating constantly.  Beat until stiff peaks form.
6.  Use immediately.

Saturday, November 28, 2015

Spatchcocking a Turkey

First, let's take a moment to appreciate what a glorious word "Spatchccoking" is. I have no idea where the word came from.  It sounds vaguely Hungarian.  I had never heard of this technique until Elizabeth saw it in a Parade magazine a month ago and sent me the link with the thought, "What do you think?".  Ever the adventurous one, I agreed that we should give it a try.  And we are transformed, reformed, converted, ready to change our ways.

It does take a certain leap of faith and willingness to  change the way you cook.  You will not end up with a Norman Rockwell version of a turkey.  You will have a flattened version, much like if a truck ran over your turkey while you weren't looking. But the meat will be juicier and the bird will play well with others instead of hogging the oven. It cooks in half the time.

Here's what you do to spatchcock a turkey. 

First things, first:  Remember that turkeys are big birds. 
Basically, you remove the backbone and then lay the bird flat on a cookie sheet, as flat as you can get it.  The instructions I got called for kitchen shears but I knew better and got the biggest searrated knife I owned and the firmest grip I could muster and grabbed that bird with its tail in the air and it's wings holding balance on the counter and just reamed the knife down, sawing hard as I went.  You gotta watch not only the knife but the sharp edges of the bones as you cut through the rib cage.  Repeat the same process.  You're basically just cutting the back out, leaving the breast and wings as you are familiar with them.  You will need to cut through the breast center to flatten it; no need to cut through it completely, just enough to release it.  Pat around on the bird to assure yourself lyou have it as flat as you can get it.  Tuck the wings underneath themselves. 


Rub butter all over it.  Or olive oil.  Salt and pepper.

You will notice how big this bird is.  Turkeys are like that.  That's why we serve turkeys for big meals like Thanksgiving instead of chickens. You don't see anybody pigging out over a chicken. This presents a problem for your oven. 

You may not have, indeed--you probably will NOT have room for a big bird.  Instead, I got two small turkeys.  Here is a picture of one of them before and after:


I cooked them both at the same time.  Yes, there was room because they lay very flat and I used both shelves.  The recipe calls for 450 degrees for 90 minutes.  This sounds wrong but it works.  You can trust me.  I did it at my house, in my oven.  And you are looking at the picture of the turkey that came out of my oven set at 450 degrees.  This gave us a whole lot of extra time.  I cut up the turkey and covered it with foil and set it aside.  I think I set it in a roasting pan set on warm with a little water in the bottom for steam and let it rest there for about 30 minutes while we used the oven to heat the casseroles and the rolls.

I do believe this was the lowest stress Thanksgiving meal I've ever cooked.  And I am not known for my stress-free Thanksgivings. But they are tasty.

Friday, April 17, 2015

French tost casserole


French toast casserole with fruit

    • 1 small loaf day-old French bread ( or about 1/2 of a large loaf)
    • 5 eggs
    • 3 tablespoons sugar
    • 1 teaspoon vanilla extract
    • 2 1/2 cups whole milk
    • 1/4 cup flour
    • 6 tablespoons brown sugar, packed
    • 1/2 teaspoon cinnamon
    • 1/4 cup butter
    • 1 cup blueberries
    • 1 cup strawberry, sliced

Directions

1.    Lightly grease 9x13 pan.

2.    Cut the bread in 3/4-inch slices.

3.    Layer in the pan, fitting snugly. In a bowl, lightly beat the eggs, sugar and vanilla.

4.    Stir in the milk.

5.    Pour over bread; turn bread slices over.

6.    Cover and refrigerate overnight.

7.    In the morning, pre-heat the oven to 375 degrees.

8.    In a bowl, combine the flour, brown sugar and cinnamon.

9.    Cut the butter in bits, add to the mix and rub together to make a crumb topping.

10. Remove the pan from the fridge, carefully turn the bread pieces over and scatter mixed berries evenly over the bread.

11. Sprinkle with crumb topping.

12. Bake at 375 degrees for 35-40 minutes, until puffy and golden.

Saturday, December 7, 2013

Egg Nog

Everybody wants egg nog at Christmas.  One of the several things my daddy was proud of was that one of his patients was the man who personally was in charge of making the egg nog at Oak Farms Dairy in Oak Cliff in the 1950's.  And every Christmastime, even if he wasn't sick, Mr Laguard would stop by Daddy's office to bring him a carton of egg nog.  And every year Daddy would take enormous pride in the delivery of the egg nog as though  Shorty Laguard had made it just for him..

Beaven's daddy also made a killer egg nog.  Except George made his from ice cream and bourbon.  The ice cream gave it a smooth richness and the bourbon insured that it never reached a frozen state again.  George stored it in the freezer and it was about as cold as egg nog could be but never froze.  It had so much bourbon in it that I swear you could have set fire to it. One year when Emily was in middle school she and a friend visited George and Blanche with us, drank some egg nog and got their first buzz.  Slept all the way home.

Here is the recipe a friend posted.  Looks rich and creamy.  No bourbon.  Add your own. 


Mike Cole’s Egg Nog

1 1/3 cup sugar
8 egg yolks
8 egg whites
1 tsp salt
1 gallon whole milk
4 tsp vanilla
2 cups heavy whipping cream

Beat 1 1/3 cup sugar into egg yolks, add salt and stir in milk. Cook over medium heat, stirring constantly until mixture “coats” a spoon. Chill.

Beat egg whites till foamy. Gradually add ¼ cup sugar, beating to soft peaks. Stir into the custard mixture and mix thoroughly. Add vanilla. Mix the whipped cream until fully whipped, add ¼ cup sugar as you are whipping. If you are saving for use, add the whipped cream and mix thoroughly. Chill and store. If you are using for a party, pour the custard mixture into a punch bowl and “dot” the mixture with islands of whipped cream. Sprinkle with nutmeg for effect and taste.

Friday, November 29, 2013

Sticky Buns

It's the morning after Thanksgiving and everybody is Turkey Comatose and you've cooked everything with any kind of Wow factor.  Try this.  It's Ina Garten's recipe.  Her stuff always works.

Of course, you don't have a package of puff pastry in your freezer.  You were looking for an excuse to go to Walmart on the day after Thanksgiving, weren't you? I'm sure there will be no one in the grocery department.

Whenever you make this, it is a surefire winner.  I've never known it to fail or fail to please.  Ina uses raisins in her recipe but I don't like raisins so I don't have them here.  If you want, use them in place or in addition to the pecans.

Notice the ingredients are two parts:  one step is putting stuff in the muffins tins and also putting filling on the pastry. This is a real sugar overload.


Ingredients
12 tablespoons (1 1/2 sticks) unsalted butter, at room temperature.
1/3 cup light brown sugar, lightly packed
1/2 cup pecans, chopped in very large pieces

1 package (17.3-ounces/ 2-sheets) frozen puff pastry, defrosted

For the filling:
2 tablespoons unsalted butter, melted and cooled
2/3 cup light brown sugar, lightly packed
3 teaspoons ground cinnamon
1 cup raisins …. Or not.....or chopped pecans!!!  :)

Directions
Preheat the oven to 350 degrees F. Place a 12-cup standard muffin tin on a sheet pan lined with parchment paper.

In the bowl of an electric mixer fitted with the paddle attachment, combine the 12 tablespoons butter and 1/3 cup brown sugar. Place 1 rounded tablespoon of the mixture in each of the 12 muffin cups. Distribute the pecans evenly among the 12 muffin cups on top of the butter and sugar mixture.

Lightly flour a wooden board or stone surface. Unfold 1 sheet of puff pastry with the folds going left to right. Brush the whole sheet with the melted butter. Leaving a 1-inch border on the puff pastry, sprinkle each sheet with 1/3 cup of the brown sugar, 1 1/2 teaspoons of the cinnamon, and 1/2 cup of the raisins. Starting with the end nearest you, roll the pastry up snugly like a jelly roll around the filling, finishing the roll with the seam side down. Trim the ends of the roll about 1/2-inch and discard. Slice the roll in 6 equal pieces, each about 1 1/2 inches wide. Place each piece, spiral side up, in 6 of the muffin cups. Repeat with the second sheet of puff pastry to make 12 sticky buns.

Bake for 30 minutes, until the sticky buns are golden to dark brown on top and firm to the touch. Be careful - they're hot! Allow to cool for 5 minutes only, invert the buns onto the parchment paper (ease the filling and pecans out onto the buns with a spoon) and cool completely.

Read more at: http://www.foodnetwork.com/recipes/ina-garten/easy-sticky-buns-recipe/index.html?oc=linkback

Monday, July 29, 2013

Corn Bread

I have to give credit to Paula Deen for this recipe.  I don't usually cook complicated recipes but this one isn't that bad and it's worth it. It calls for buttermilk and I don't usually keep that in my house.

(You can substitute by putting a tablespoon of vinegar in regular milk and nobody will notice.  It's really the acid in the milk that counts.)

Ingredients

6 tablespoons unsalted butter, melted, plus butter for baking dish
1 cup cornmeal
3/4 cup all-purpose flour
1 tablespoon sugar
1 1/2 teaspoons baking powder
1/2 teaspoon baking soda
1/4 teaspoon salt
2 large eggs, lightly beaten
1 1/2 cups buttermilk

Directions

Preheat the oven to 425 degrees F.

Melt the butter in an iron skillet in the oven. Take it out when the butter melts and pour the melted butter into a bowl to let it cool slightly.  Put the skillet back into the oven.  This will grease the skillet and heat it at the same time.

In a large bowl, mix together the cornmeal, flour, sugar, baking powder, baking soda, and salt.

In a separate bowl, mix together the eggs, buttermilk, and butter. Pour the buttermilk mixture into the cornmeal mixture and fold together until there are no dry spots (the batter will still be lumpy). Pour the batter into the skillet.

Bake until the top is golden brown and tester inserted into the middle of the corn bread comes out clean, about 20 to 25 minutes. Remove the cornbread from the oven and let it cool for 10 minutes before serving.

Now--if you want to make this in a dutch oven over a campfire, which I highly recommend--because this is one recipe I have done this with several times and had great success with-- here's how I do it:

Since you are outside and things are a little more rustic...….

  • You will be using a dutch oven:  the cast iron skillet with (1) feet and (2) a cover that has sides to hold the coals.  It is easier to use charcoal because you can regulate the temperature by counting the charcoal but with experience and some abandonment you would just throw coals around trust it all to work out. Coal counting comes later in the recipe.
  • You can just throw the whole stick of butter in the skillet and it won't really make any difference.
  • Instead of a mixing bowl, you can mix everything together in a ziplock bag with your hands. Measure it all ahead of time back home and transport in the ziplock bag.
  •  It's great to have one of those chimney charcoal starters.  They aren't that expensive and use newspaper to start the charcoal and really work.  Then you can put things on top of it like a little table to keep stuff out of the dirt. 
  • Make sure you have good pot holders--at least two--thick ones.  And something to lift the lid.

Dutch Over Method:

  1. Melt butter in hot skillet
  2. Mix everything else in ziplock bag
  3. Slowly add butter to mix
  4. Add mix to skillet and cover
  5. Put skillet on top of 16 red hot coals.  Put 20 hot coals on lid.
  6. After about 15 minutes check inside.  Add coals or adjust as needed. 
  7. Enjoy!


Monday, February 11, 2013

Fresh Cranberry Relish

This is from the Dallas Arboretum cookbook.  Whenever I think of cranberry relish I think of the canned stuff you invariably forget to put on the table until after the meal is over. It also doesn't taste all that great.  THIS recipe is delicious.

4 cups fresh cranberries (or one package)
2 apples, cored
2 oranges, seeded
Orange zest
3/4 cup sugar

Zest the oranges.  Chop the cranberries.  Peel and chop the apples.  Peel and chop the oranges. Mix it all together with the juices from all that peeling and chopping.  Add the sugar.

If you have any left over after the big meal you can use it to make a great fruit smoothie.

Tuesday, November 20, 2012

Holiday Cooking

Of course I know better than to say I know more about cooking Thanksgiving than you do.  But I AM just sayin’ that I’ve cooked probably 80 holiday meals in the last forty or so years, if you add up all the Thanksgivings, Christmases and Easters then subtract the times we ate at Beaven’s parents' house.  For some reason I’ve always been the holiday meal sponsor but I’m not complaining because I absolutely love it.  It must appeal to both my love of control and food.  By cooking the meal I get both wishes.
Here is how I go about the big meal:
  • Start at the finish:  get out all the serving and warming dishes first.  Put post-it notes to say what will go inside them.  Then work backwards: 
  • This is where  everyone will sit
  • This is where the food will sit while we eat  
  • This is what I will keep it warm in,
  • This is what I will cook it in…do I have enough burners or room in the oven?   
  •  what do I need to buy?.. make a grocery list
The turkey is the bossiest food you can invite to the dinner.  It takes up the entire oven.  Plan on this and cook around it.  But:  you can also cover the turkey in foil and hold it an hour.  This gives you just enough time to cook the dressing and roasted vegetables.
Plan to put the rolls into the oven about the time you start calling everyone to the table.  It will take 10 minutes to get everyone seated.  Say the blessing and by the time you say “amen” the rolls will be ready. 
Other tips:
  • Those big turkey roasting pans can be used to keep the dressing warm. 
  • Mashed potatoes will stay perfect in a slow cooker set on low. 
  • Put the gravy in a coffee carafe. It keeps it warm and you can even pour from it.
  • Buy a new can of baking powder and sage every November.  You probably haven’t  used any since last year at this time and it’s out of date.
It’s too hot in November but by Christmastime you will be able to use the outside BBQ grill as an alternative refrigerator.  Remember to keep the lid on it or critters will eat your stuff.
I’ve got to go.  I let my day get away from me and the grands are about to descend and I realize I have no food in the house for any of the other days besides Thursday. 
I have an index on the blog for Thanksgiving food, including the turkey.  You’re on your own.
PS- be very careful what you put down the disposer.  It’s not used to potato peels or celery strings-- that sucker will stop up in a heartbeat and all the plumbers are out at their deer lease.