How to Use this Blog

This blog is designed to be used like a cookbook. I've put tags on each recipe so you can go to the section on that topic just by clicking on the word in the cloud or the list. Some recipes are under more than one category to help you find what you're looking for.

Tuesday, April 25, 2023

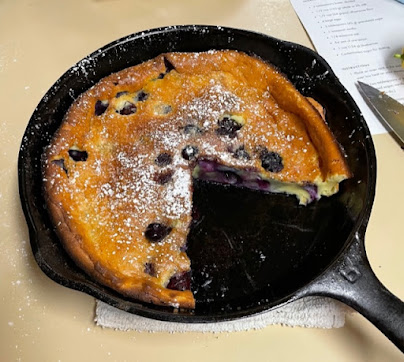
Blueberry Dutch Baby


Most of these ingredients I keep on hand except for the blueberries and lemon zest.  The blueberries are usually sold in a quantity that ends up being two cups so I need to buy two lemons.

INGREDIENTS

  • 4 tablespoons butter, divided
  • 1/2 cup  whole or 2% milk
  • 1/2 cup  all-purpose flour
  • 4 large eggs
  • 3 tablespoons sugar
  • 1 teaspoon vanilla
  • 1/4 teaspoon salt
  • the zest of one lemon
+++
  • 1 cup blueberries
  • Confectioners sugar for dusting
Maple Syrup


INSTRUCTIONS

  1. Place an oven rack in the middle position and preheat the oven to 450°F. Place a 9- or 10-inch cast iron skillet over low heat on your stovetop. Keep it over low heat while you prepare the batter. 
  2. Melt two tablespoons of the butter in the cast iron skillet, then transfer to a blender. Add the milk, flour, eggs, granulated sugar, vanilla, salt, and lemon zest, and blend until smooth. (Do not skip this step — the batter will be lumpy if you do.)
  3. Place the remaining 2 tablespoons of butter into the cast iron skillet. Turn the heat up to medium-high. Let the butter melt, add the blueberries, and give the skillet a shake. Immediately pour the batter over the blueberries and transfer the skillet to the oven. Bake until the pancake is puffed and golden, about 15 minutes.
  4. You might be tempted to open the oven to check on things-especially if your oven glass door is dirty like mine and you can't see.  Resist this temptation and trust your oven temperature.  It will be ready in 15 minutes; no sooner and no later.  If you open the door you run the risk that it will fall and maybe you have invited guests that you want to see the dramatic tall dish that will then fall right before them and not in the depths of your oven.  
  5. Remove pan from the oven, and dust with confectioners sugar, if you wish. Cut and serve immediately with maple syrup. Yes, it will fall.  You have not failed.  And if you can't serve it immediately, that's OK, too.  Hot blueberries can be overwhelming. But nobody is going to want to wait.  This is tasty. 

Thursday, December 15, 2022

Orange Mustard Sauce


Here's a easy and flavorful way to dress up a sandwich for something special like a party or just making your lunch seem special.  

Equal parts of Grey Poupon mustard to Orange Marmalade.  Mix them together.  That's it.  No more, no less.  You can spread it on or add to each bite.  Put it on the plate or add to the buffet table in a small bowl.


Monday, November 21, 2022

Cranberry Salsa


This is the color of Christmas.  It makes you glad you live in Texas so you can add jalapeno peppers and cilantro to something this color.  It just LOOKS like Christmas.  And if you're gonna live in Texas this is the thing to eat for Christmas.

And I will caution you to taste as you go.  Don't blindly add a bunch of jalapeno peppers to anything or you will be sorry, especially if you have a bunch of Yankees amateurs eating your stuff.  I also advise against cutting it into coarse chunks.  Really.  As nice as the green color is, you really are in it for the taste more than the color.  You can let the cilantro be your color.  You don't want to abuse your guests.  

In order to do this, I cut the jalapeno separately up in a food processor after cutting out the membrane and seeds, add an orange in while you are processing it (otherwise there's not enough to process one measly little pepper).  Set the pepper and orange aside in a small dish.  

chop the cranberries in a food processor 
one 12 ounce bag fresh cranberries washed.

bunch cilantro  (go slow...chop and add 3/4....taste and see if you want more)
1 bunch green onions, sliced thin and chopped....
juice of 2 limes
pinch of salt
3/4 cup sugar

after you get everything all mixed together add the jalapeno and start tasting.  

If you don't use all the jalapeno at first, save it and wait until the next day to see if you want to add more.  Sometimes you get a little more brave.  Just remember you can always add more later but you can't take it out once it's in there.

You might even be one of those people to add a second pepper.  Go for it. 

Now, you can add this to a chunk of Cream Cheese or slices of Brie and crackers or whatever else you want.

Merry Christmas.  


Sunday, September 4, 2022

Donut Souffle

 3 large glazed donuts....from that morning or the day before

1 cup of milk

3 eggs

2 TBSP sugar

1 TBSP vanilla

1 teaspoon cinnamon

grated nutmeg

+++++++++++

slice the donuts into discs and lay flat in a dish

blend rest of ingredients well and pour over donuts

get the donuts submerged into the liquid until it starts soaking up the liquid and cover it with plastic wrap.  Put into the refrigerator and let set for a while until it soaks up all the liquid.  It might be ready in a couple of hours.

Heat the oven to 375 and cook for about 30 minutes until it is puffy and set--not jiggly.

You might make a carmel sauce for it.  

Monday, April 4, 2022

Mushroom Soup


I got this recipe from Linda Terpstra who got it from a cookbook.  I think she said it might have been one of those Dallas classics like the Arboretum or such.  But it's such a basic I figure it's in every cookbook in America.  I loved the mushroom soup at Monk's Oven restaurant and when they closed the restaurant, I told Shannon Monk I wanted her to give me the recipe.  But she said it was in another cookbook and I could find it there.  So apparently, it's not any big secret. 

Linda and I use 4 tablespoons of flour.  I also only use 1 cup of whipping cream so that it's slightly thicker.  I also throw in a dash of sherry.  

It freezes well so when I make it, I always freeze the leftovers in 1-pint Ziplock bags.  It's great for an impromptu fancy lunch.


Thursday, May 20, 2021

Chocolate Tart

 This is so rich that I cut it into much smaller slices than this calls for. Serve it with whipped cream on the side. 

Ina Garten’s Dark Chocolate Tart

This is inspired by a recipe in Erin French’s cookbook The Lost Kitchen.

  • For the crust:
  • 1 (9-ounce) box Nabisco chocolate wafers….if you can’t find this, take 24 or 25 Oreo cookies and separate them, discard the filling and use both halves of the cookie.
  • ¼ cup sugar
  • 6 tablespoons unsalted butter, melted
  • For the filling:
  • 1 cup bittersweet chocolate, finely chopped (6½ ounces) (see note)
  • 1¼ cups heavy cream
  • 2 extra-large eggs, lightly beaten
  • 1 teaspoon pure vanilla extract
  • For the glaze:
  • ½ cup bittersweet chocolate, finely chopped (3 ounces)
  • ¼ cup heavy cream
  • ¼ teaspoon coffee granules
  • ½ teaspoon flaked sea salt, such as Maldon....*I use Kosher salt and it works.  I don't have any kind of specialty stores out here in the country.  

Preheat the oven to 350 degrees.  It really does help if you make this in a springform pan. I made it once in a pie pan and it worked but it wasn't nearly as impressive.

Place the chocolate wafers and sugar in the bowl of a food processor fitted with the steel blade and process until finely ground. Pour the mixture into a bowl, add the butter, and mix until well incorporated. Press the mixture into the bottom and sides of a 9-inch tart pan with a removable bottom. Place on a sheet pan and bake for 10 minutes. Set aside.

Meanwhile, for the filing, place the 1 cup of chocolate in a medium glass bowl. Heat the cream until it just comes to a boil. Pour the cream over the chocolate, allow it to sit for 1 minute, then stir gently with a whisk until smooth (see note). Stir the eggs and vanilla into the chocolate until smooth and pour into the tart shell. Bake for 18 to 20 minutes, until the chocolate is set on the edges but still jiggly in the middle. Set aside to cool.  

Jane's note:  she is serious about the "jiggly in the middle and set on the edges".  The jiggly-ness will set in about two-five minutes.  Don't fear the jiggly.  It's OK.  Go with the jiggly.

For the glaze, put the ½ cup chocolate and the coffee in a glass bowl. Heat the cream to simmering and pour it over the chocolate. Let sit for 1 minute, then whisk until smooth. Gently pour over the chocolate filling (not the crust) and spread to the inside edge of the crust with a knife or offset spatula. Sprinkle with the salt and set aside at room temperature until set. Remove the rim of the tart pan and place the tart on a flat serving plate. Cut in wedges (don’t worry if the crust crumbles) and serve at room temperature.


Wednesday, March 10, 2021

Pretzels

One of the best traditions Beaven and I ever started was Grand Camp which is basically whenever we get our granddaughters here to stay more than a weekend--usually at Spring Break.  We're facing the end of Grand Camps with Sarah in her last year of college now.  Fortunately, she will be teaching school so will continue to get to celebrate Spring Breaks indefinitely, in theory.

And one of our great traditions of Grand Camp is cooking.  We started with cherry pie and continued through dutch oven biscuits and roasts and pizzas.  Eventually, she started bringing me recipes.  This year it is pretzels.

Sarah made these exactly as the recipe said.  Probably the butter was salted butter but I've never known that to make much difference.  Maybe we will end up in the bad corner of Chef Heaven.  Also, we didn't have parchment paper and used aluminum foil and the pretzels stuck to that. So, for the second batch (because they were THAT good) we went to the store and bought parchment paper. 


Pretzels

  • 2 ¼ tsp active dry yeast 1 standard packet
  • 1 cup warm water
  • 1 tbs unsalted butter melted
  • 1 tsp sugar
  • 1 tsp salt
  • 3 cups all-purpose flour + up to ¾ cup more if needed

2 cups water

  • 4 tbs baking soda
  • 1 tbs coarse salt for sprinkling on top

6 tbs salted butter, melted

INSTRUCTIONS

 1.           Preheat oven to 475 degrees and line a large baking sheet or two baking sheets with parchment paper.......my oven runs a little hot and she ended taking them out early when they started looking like they would burn.

2.           Combine yeast with warm water and sugar in the bowl of your stand mixer fitted with hook attachment. Once mixture becomes "frothy" your yeast is ready. Stir in salt and 1 tbs of melted butter. Add flour 1 cup at a time until a dough forms and is no longer sticky. You may need more or less depending on temperature differences. If you press your finger into the dough and it bounces back, it's ready to knead. Knead dough for 5 more minutes until smooth and pliable.

3.           Form dough into a ball by hand. Lightly grease the bowl used previously and place the dough back in to rest for 15 minutes. Cover with a damp towel.

4.           In a medium sized pot, boil 2 cups of water with 4 tbs of baking soda. Once the baking soda is mostly dissolved, take mixture off heat and allow it to come down to a lukewarm temperature. Pour into a 9×9 baking dish once cooled down.

5.           After 15 minutes, take dough out of the bowl and flatten slightly with the palm of your hand. Cut dough into 8 sections (like a pizza). Roll each triangle into a long rope, about 19-20 inches long. Shape dough into pretzel shape and place in baking soda bath for 2 minutes. If the whole pretzel isn't covered by the water, spoon it on top of the areas is doesn't reach. Once the 2 minutes is up, carefully pick pretzel up either by your hand or with the help of a fork or spatula and place on prepared baking sheet. You may have to re-shape slightly.

6.           Sprinkle the pretzels with coarse salt while still wet. Repeat these steps until all 8 pretzels are prepared and on the baking sheets.

7.           Bake pretzels for 8-9 minutes or until golden brown. Immediately from the oven, brush (heavily) with 6 tbs of melted butter.

8.           These homemade soft pretzels are best served hot and fresh out of the oven but will keep for about 2 days stored at room temperature in an airtight container. Pop them in the microwave and they’re good as new!

NOTES

  1. Make Ahead Instructions: Prepared dough can be made one day in advance. Shape the pretzels and allow them to rest for 10 minutes before popping them into the oven. Prepared dough can also be frozen for up to 3 months. Thaw frozen dough overnight in the refrigerator.
  2. Freezing Instructions: Freeze baked and cooled pretzels for up to 3 months. To reheat, bake (frozen) at 375 degrees for 15-18 minutes or until center is warmed through. You can also microwave for a few minutes until heated through.
  3. Pretzel Bites: When rolling dough into a long rope in step 4, instead of shaping pieces into a large pretzel, cut the dough into 1-2 inch pieces. Follow the rest of the recipe instructions.


I have some photos and videos I can post later.  We've made these twice now and the second time they weren't quite as crunchy as the first--the difference being that the first time we didn't have parchment paper so substituted aluminum foil for the first time then we bought some to use for the second batch.  Sarah thinks aluminum foil gets hotter and makes the difference.  She likes them either way.  I like the crunch.   Also, I spread way too much salt on them.  watch the salt.